Table of Contents
- 1. Introduction
- 2. Installation
- 3. Getting Started
- 4. Working with Documents
- 5. Working with Categories
- 6. Searches, Queries and Code Reviews
- A. Licence, Source Code and Warranty
- B. Implementation Notes
List of Figures
- 3.1. Starting a new project in The Weft QDA workarea
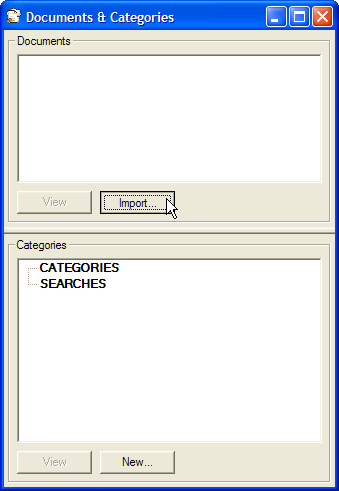
- 3.2. Importing a new document from the Documents and Categories window
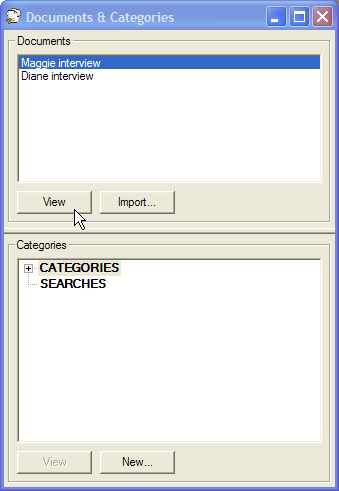
- 4.1. Using the document list to open a document
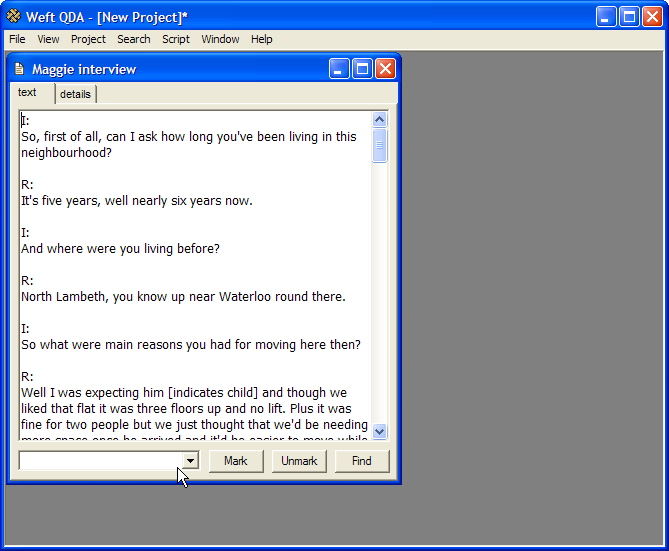
- 4.2. A document opened for viewing
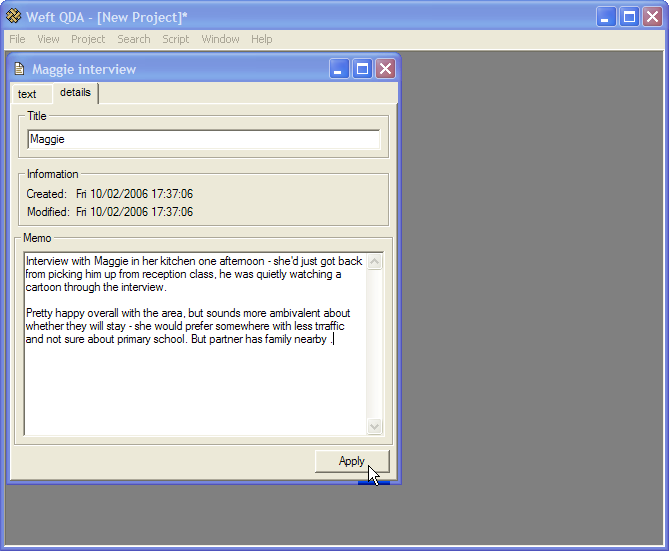
- 4.3. The document details pane
- 5.1. Creating a new category to organise 'interview questions'
- 5.2. Marking a text passage from a document with a category
- 5.3. Viewing a category's text
- 5.4. Changing a category's name and creating a memo
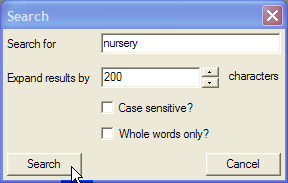
- 6.1. Doing a text search
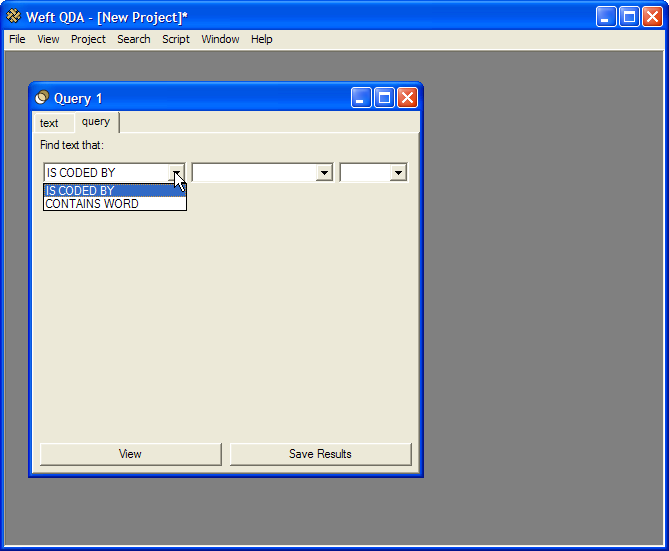
- 6.2. A blank query
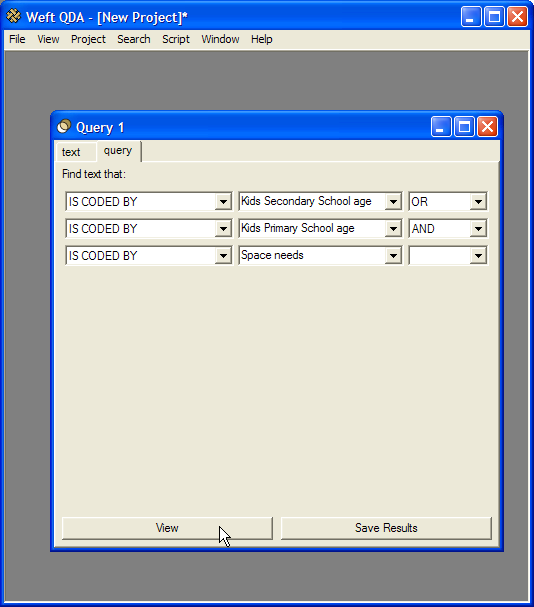
- 6.3. An example query
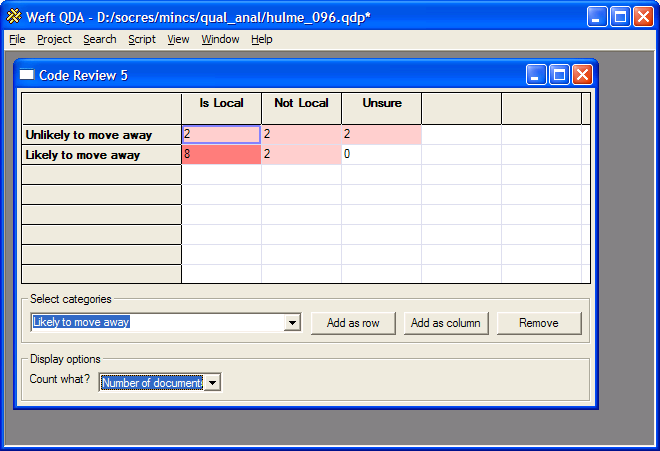
- 6.4. A code review
Table of Contents
Weft QDA is a software tool for the analysis of textual data such as interview transcripts, documents and field notes. It's available free under a public domain licence.
Import documents from plain text or PDF
'Code-and-retrieve' document text with different categories
Attach and update memos to categories and documents
Free text search and boolean queries
Coding statistics and simple cross-tabulations
Export text and numbers for browsing and further analysis
Single-file project format (*.qdp)
Most textbooks and articles on qualitative data analysis stress the importance of choosing a software package that fitting your own particular method and methodology. Weft QDA offers a generic set of facilities for working with text documents, and doesn't make any particular assumptions about how to think about and generalise from data. At the same time, there may be a fair number of other CAQDAS packages available to you, especially if you use Microsoft Windows, and especially if you have money. So the following list summarises some situations where Weft QDA may be particularly suitable, and some where you might be advised to use an alternative software tool.
- You are unable or unwilling to pay for commercial CAQDAS software
Commercial CAQDAS software is expensive, putting it beyond the reach of many students and researchers who would otherwise find it useful. Even crippled and restrictively licensed versions are sold for hefty prices. Weft QDA is available completely free of charge or restriction - who doesn't love getting Free Stuff?
- Ease of use matters
Weft QDA is easy to use compared to other CAQDAS packages. This is partly because it offers doesn't squeeze in every possible extra, concentrating on a solid set of core features based around 'code and retrieve'. However it's also because it uses modern platform-standard GUI controls, actions and window handling, and strives to avoid the idiosyncracies and irritations common in commercial and free CAQDAS.
- You are using qualitative data analysis software for the first time
As well as an uncluttered interface, Weft QDA comes with complete user documentation. It's particularly aimed at those who have a general familiarity with desktop software, but no prior experience of using qualitative data analysis tools.
- You are teaching qualitative data analysis
Weft QDA is ideal for introducing some common CAQDAS approaches and practices to students who have not previously used this sort of software. Weft's free availability means that students can download and use the software themselves outside of classroom or computer lab sessions.
- You use Linux
Weft QDA is one of very few CAQDAS applications which runs on Linux. It also runs on modest hardware.
- You need to work with images, audio or video
Weft QDA currently only allows the analysis of text documents, whereas many other packages allow the analysis of still images, video and/or audio files.
- You need to work with "rich" text
Many commercial packages allow the analysis of "rich" text, with styling like bold, italic, colour, and possibly including tables or figures. Weft QDA requires documents to be converted to "plain" text before being imported into a project.
- You need specific advanced features
Some other packages include specific advanced features to support specialist types of analysis, such as concordances, fuzzy matching, visual theory modelling and so on. If you definitely need these features, you need a package that offers them - though suggestions for future additions to Weft are very welcome.
- You are working with multilingual documents
Weft does not support working with documents in multiple different scripts (such as Latin, Japanese, Chinese, Cyrillic and so on) within a single project. Some other packages do support multilingual projects.
- You need dedicated paid support
Weft QDA is well supported by user documentation, a user mailing list and by email. However, other packages may be supported by a dedicated helpdesk, institutional IT departments or academic networks.
- Project
A project is a collection of related text documents stored in a single file together with observations, insights and notes relating to those documents.
- Document
The units of textual data that are imported into the project for analysis. Documents may be annotated with editable memos. However, once imported, a document's text cannot be altered. This is a temporary limitation rather than a deliberate feature.
- Category
An analytic theme, idea, variable, whatever, that attempts to describe certain passages of the text data. These are sometimes referred to as "codes" in the literature, and in other packages. Categories can be organised in a hierarchical pattern, and can have editable memos associated with them.
- Marking
A user records the connection between a category and a passage of text by "marking" the document section with the category. In the sociological methods literature, this procedure is often called "coding" a document. Marked or coded text can be retrieved subsequently for comparison and review.
Table of Contents
Weft QDA is fully supported on Microsoft Windows. Weft QDA is known to work on various versions of Microsoft Windows including XP, 2000, ME, 98 and NT4. Windows XP or 2000 are recommended if possible simply because these are the most common and so best tested platforms for running Weft. The easiest way to install Weft on Windows is to use an all-in-one easy installer package - see the section called “Easy Installer for Windows” below.
Weft QDA is known to work major Linux distributions including Debian, Redhat Ubuntu and Mandrake and will likely work on many other *nixes. Because of the variationsin Linux distributions and tools, installation is a slightly more involved process than on Microsoft Windows. You should have some familiarity with using your distribution's package manager and compiling applications using gcc.
Weft QDA does not currently work on OS X. However, pending developments in wxruby, it is likely to be possible to run Weft QDA on OS X in the future. If you are looking for a free CAQDAS package native to OS X, you may be interested in TAMS Analyzer, which is a stable and fully-featured package.
An advantage of Weft's simplicity is that it will run on quite modest computer hardware. Hardware requirements will vary depending on your operating system and project size, but a Pentium processor and 32MB of RAM should be adequate for Weft QDA itself.
Weft QDA makes use various other free software components and libraries. If you are using the Windows installer package, all of these components are already bundled together for you; there is no need to download or install any additional software. You can skip this section and go to the section called “Easy Installer for Windows”. If you are using Weft QDA on GNU/Linux, some or all of these items may need to be installed separately before Weft can be used.
- Ruby
A recent (>1.8) version of the Ruby interpreter; http://www.ruby-lang.org/. Ruby is the object-oriented programming language in which Weft QDA is written.
- SQLite
The SQLite library, version 2; http://www.sqlite.org/ . SQLite is a small, file-based relational database which Weft uses to store project documents and categories.
- Ruby libraries
Weft QDA users two add-on packages: sqlite-ruby , the ruby bindings for sqlite, version 2.2.x; http://www.rubyforge.org/projects/sqlite-ruby, and PageTemplate, v 2.x.
- WxWidgets
The WxWidgets library, version 2.4.2; http://www.wxwidgets.org. Version 2.4, not 2.6 is required. WxWidgets enables the creation of native GUIs (graphical user interfaces) on different desktop operating systems.
- GTK 1.2
GTK is a Linux interface toolkit, and is only required if you are using Linux as WxWidgets is built on top it. In many Linux distributions it will already be installed. In almost all others, it should be available through the package manager, and will be most easily installed by this method instead of compiling from source. On Ubuntu Linux, for example, GTK 1.2 can be installed using "apt-get install libgtk1.2-dev". http://www.gtk.org/
- WxRuby
WxRuby, the ruby bindings to the WxWidgets library, version 0.6.0; http://rubyforge.org/projects/wxruby. wxruby2, the redevelopment of wxruby SWIG doesn't yet support all the features needed for Weft.
- PDFtoText
The PDFtoText utility is required if you want to import documents from PDF documents. The utility is available from http://www.xpdf.org, and the executable should be installed somewhere in your PATH.
There are a number of different ways to install Weft QDA. They're listed below, in descending order of ease. You only need to use one of these methods, and unless you're interested in the technical aspects of Weft, you should probably choose an installer or compiled binary.
Installing on Microsoft Windows should be a simple matter of downloading the most recent installer from the Weft QDA website. Save the installer file to disk, then click on the downloaded file to start the automatic installation process. During this you'll be offered the choices to install the help file and to add shortcuts to your menu. It's recommended that you accept both. When the installation process is complete, Weft QDA can be started by clicking its icon in the system menu.
Weft QDA is written the programming language Ruby. Rubygems is a package manager for Ruby, and is probably to get Weft QDA and its required packages if you cannot use an installer. You will first need to install Ruby itself, if you do not already have it. Then you will need to install wxruby, and possibly the sqlite library if you do not already have it.
All the other requirements can be installed automatically usingn rubygems. Run
"gem install weft-qda" to download and install the weft-qda gem, plus all the other
require ruby packages. Weft QDA can then be run by running the installed weft-qda.rb
from your ruby bin dir - often
/usr/local/bin/ruby/weft_qda.rb on Linux or
C:/ruby/bin/weft_qda.rb on Windows.
If you need or prefer to run from a standard source code package, this is available as a standard tarball for use on Windows and Linux. You will have to download and install all the requirements, as listed above.
The source is organised so that it can be run in-place, provided all the prerequisites above are fulfilled. Simply unpack the tarball, and run "ruby weft-qda.rb" in the base directory. There is currently no 'setup.rb' to support installing weft's libraries into Ruby's standard library directories.
Weft QDA is being actively developed, and versions are periodically released with new features and fixes for bugs. Upgrading Weft should be straightforward, whether you use an installer or are using a source package and have already installed the prerequisites yourself.
There may be more than one 'current' version of Weft available at any time. The stable version, with a version number 1.x.y, where x is an even number, is the most tested and reliable release. This is the one recommended for general use. An experimental version has a version number 1.x.y, where x is an odd number. Experimental versions have the newest features, but may have more bugs, and less documentation. They are intended for people who want to test out the latest features.
The Weft Project File Format (*.qdp) can be read by any version 1.x.x of Weft QDA. Very old pre-release versions of the software - 0.9.5 and below - may not be able read projects created in newer versions of Weft QDA.
Version 0.9.4 experimented with an alternative file format which is incompatible with all other versions of Weft. This version should not now be in use, but if you have a project created in 0.9.4 that you need to use elsewhere, you should consult the version 0.9.5 documentation, which explains how to upgrade.
Table of Contents
This and the remaining chapters describe how to use Weft QDA. For the benefit of users familiar with CAQDAS software, the following section summarises some steps in a typical working session. The remainder of the manual describe all the software's features in more detail beginning with starting a new project.
Start a new project by choosing from the menu.
Import some text documents by clicking button beneath the empty list of documents.
Create some categories by using the button beneath the empty category tree.
Open up the document you want to examine by double-clicking its title in the document list, or by selecting it and clicking the button.
Click once on a category in the tree to select it as the currently active category for marking document text. Then, select text passages within a document that you want to mark, and click the button to apply the code to that section.
Double-click on a category, or select it and click the to open it in a separate window and review all the passages of text that have been marked by it.
If you haven't already done so, start Weft QDA. Weft should start with just the menu bar showing at the top and a blank area below. This blank area is the work area. The documents, categories, searches and other parts of your project appear in this area when you are working on them.
All the data that are added to a Weft project, and all the categories and analysis using those categories are stored together in a single file, a Project File. So before you can start your analysis in Weft, you must first start an new empty project by choosing from the menu.
Alternately, you can continue work on an existing saved project file. To open a project, choose from the menu, and select the appropriate "qdp" project file from your hard disk.
Note that you can only have one project open at a time. If you already have a project open when you start or open another project, the old one will be closed. If there are unsaved changes in the current project, you will be prompted to save or discard these before the next project is opened.
When a project is opened, or a new one started, a new smaller window will open, in which the project's documents and categories will appear as you create them. This is called the Documents & Categories window. In the top half of this window, labelled Documents is the Document List. All documents that you import into the project for analysis are listed here. In the lower half of the window is the Category Tree, labelled Categories . All the categories you create to mark your documents are displayed here, in a organised in a hierarchical tree. structure. Saved search and query results woll also be found in the Category Tree.
You may wish to arrange the main Workarea window and The Documents & Categories so you can move comfortably between the two while working. Weft QDA will remember your preferred arrangement of windows between working sessions. The Documents & Categories window can be shown and hidden while working on a project by using the in the menu. Use this menu command to show the Documents & Categories window again if you have closed it.
Note
These descriptions of the Workarea and Document and Categories windows totheMicrosoft Windows version of Weft QDA. The menu options, buttons and working actions are the same in the GNU/Linux version. However, the windows are organised slightly differently. Documents and categories are loaded into the main window when a project is opened or started.
Once you have made changes to a project by importing new documents, creating categories or marking text, you can save these changes to the project file. Choose from the menu. If you are working on a new project Weft QDA will prompt you for a name and location to save the project to.
If you want to discard changes to a saved project and return it to its last-saved state, choose . Weft will warn you that all your unsaved changes will be lost.
Table of Contents
Documents are the raw material of your analysis. They may be interview transcripts, field observation notes, texts produced in the field such as posters or leaflets, newspaper articles and so on. At present, Weft only supports the analysis of textual material, though it is hoped to add support for the analysis of images in future versions of Weft QDA.
Documents are added to a project by importing them from files saved on your computer. Weft can import documents in the plain text and PDF formats. The process of of importing a file copies the text in the file into a new document. It also indexes the text in the file so that it can be quickly searched later.
Plain text is a simple file format that contains just letters and punctuation, without special formatting such as bold, colour, or differen-sized type. Plain text is the preferred file format for importing into Weft QDA.
Plain text can be produced in many common software applications, including word-processing software. To save a file in plain text format from within a word-processing package such as Word or OpenOffice, there is usually a menu option to , and then selecting the option for in File Type setting in the Save dialog. You may be offered additional options when saving a text file, such as line endings and encoding; the default options are normally suitable. See the section called “More about importing documents” below.
Make sure you have a project open into which to import documents.
Click the button within the Documents & Categories window. Alternatively, choose then from the menu.
Find the file or files on your computer that you want to import. To import multiple files in a batch, you should select each one by clicking its name with the CTRL button held down.
When ready, click the "Open" button, and then the file or files you selected will be imported as documents. Importing many documents, or long documents may take a little time, as the words in the file are scanned and indexed. A little window shows to update you on progress.
Imported documents will appear at the of the document list in Documents and Categories window. Each imported document will be given a document title based on the name of the file from which it was imported. So if you imported a text file called
interview.txt, a document called 'interview' would be created. You can change a document's title once it's imported: see the section called “Changing a document's title and adding a memo”.If you import the same file twice, a new, separate copy of the document is created; it will have a number appended to its title to distinguish it from the first copy. So if you imported a file called
interview.txt, and there was already a document with the title 'interview' in your project, a new document called 'interivew (1)' would be created.
Tip
Plain text files give the most consistent results when imported into Weft as they can be imported directly without an prior conversion. If possible, acquire or convert your documents into plain text format before importing them.
Acrobat PDF is a file format that is commonly used on the internet. It is often used, for example, for distributing articles from journals. Although PDFs can contain images and diagrams, Weft is only able to import the textual content of the files.
The process for importing PDFs is broadly the same as for importing plain text documents. When finding files on your computer to import, select "PDF documents" from the menu Files of Type... option list at the bottom of the file chooser window.
Note
Some PDF files are "locked". This is especially common - and especially irritating - among files from some journal article providers. It means that the text in the PDF cannot be copied or extracted, and so cannot be imported into Weft. When trying to import locked PDF files, no text will be imported and a warning will be shown instead.
Note
Note that the ability to use PDF documents depends on the pdftotext utility. Windows users using the installer will have this automatically as part of the bundle. Other users may have to install the software themselves; for more information see the installation chapter.
When saving plain text files, you may be asked whether you want to 'insert line endings' - either option is fine, though you may find that not inserting 'hard line breaks' in the plain text, as Weft will automatically wrap and resize the text in documents automatically when you are reading it.
You may also be asked what 'encoding' you want to use to save a plain text file. For European languages including English, the 'ASCII' 'iso-latin-88xx' or 'windows latin' are most suitable. Do not choose 'utf-8' or 'utf-16' encodings, especially if your source document file contains accented characters or special symbols. Similarly, if you are working with non-Western scripts, choose your platform's native encoding for that script in preference to a universal encoding like 'utf-8' or 'utf-16'.
Weft is capable of handling large documents. It has been tested with documents as long as three hundred A4 pages. Problems may arise with very large source documents, and if this occurs, it may be possible to split a source document into several parts.
Note that larger documents will take longer to import, and very large documents may cause Weft to work more slowly. Obviously, this will also depend on how fast a computer you are using.
When a document is imported, its textual content is scanned and indexed so that word searches can later be performed quickly. See Chapter 6, Searches, Queries and Code Reviews for more information.
Once a document has been imported from a file, it can be read and marked for the categories it contains. To open a document for reading, either double-click its name in list in the Document and Categories window, or highlight its name and press the button.
A window will open within the workarea, showing the document's text. Use the scroll bar on the right of the window to move through the document. The next chapter explains how to use the coding buttons at the bottom of the screen.
You can change the size and font used to display text from documents. Simply choose from the menu. The same font is used to display document text in all windows in the workarea.
Within the document's window, click on the 'Details' tab. Within the text boxes you can enter a new title and a memo for the document. Before closing the document, save any changes by clicking the .
To delete a document, simply highlight its name in the document list in the Documents and Categories window, and press the Delete key. Alternately, highlight its name and choose from the menu. The document, and any associated memo and coding will be deleted.
Warning
You should think carefully before deleting a document. Once deleted, a document cannot be retrieved except by reverting to a previous version of the project.
Table of Contents
Categories are themes, ideas, coincidences and variables that you use to describe and inter-relate passages of text within documents. Particular passages of text are "marked" by categories.
Go to the category tree at the bottom of the Documents & Categories window. Here all of the categories in your project are arranged in a tree
Select the existing category under which you want to add a new category by highlighting it in the tree. If no category is selected, the new category will be added to the base of the tree of categories.
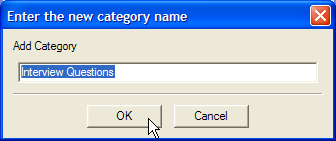
Click the button below the category tree. A small window will appear prompting you for a name for the new category. Enter your name here - this should be a short but descriptive name for the category.
Alternately, you can create a new category by selecting from the menu.
Press Enter or click the button to create the category. The new category will be displayed in the category tree.
There are no rules about the names you can give to categories, but no more than a few descriptive words is ideal. The name can contain punctuation characters, but should not have the slash character '/' at the beginning or end.
If you are working with interviews where you have ask different respondents similar questions, one place to start is to create categories that mark text where a particular questions was asked in different interviews. This will allow you to come back and compare people's replies side-by-side. First, it's a good idea to create a single cateogry in the tree under which to store the different questions. This will help organise your categories, as you create more as you develop and refine your analysis.
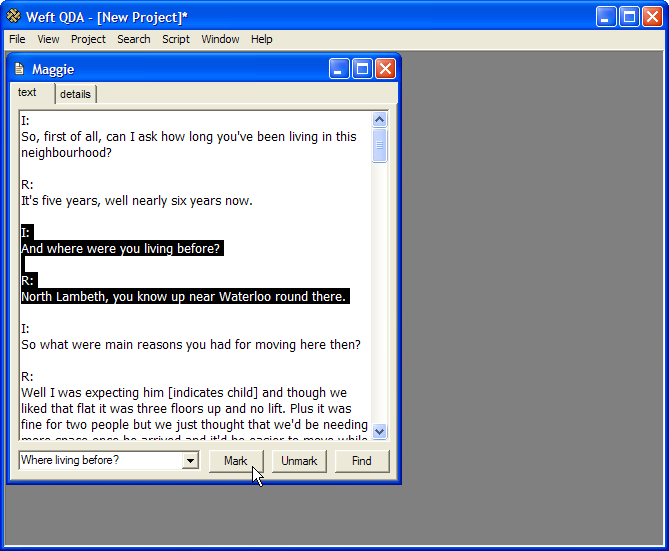
To then add categories to represent the questions, click the button with the newly-created 'Interview questions' category selected in the Category tree. Type in the name - a short summary of the question is good, such as 'Where living before?', if the respond was asked 'Where were you living before you moved ?' then click
As you read documents that have imported, you can mark passages of text as relating to one of the categories you have created. First, to mark a document, open it by double-clicking its name in the Documents & Categories window.
There are several ways to choose the category that you want to mark the open document with. The first of the methods below is simpler, the others may be faster for more experienced users, or when working with a large number of categories.
Select the category from within the category tree in the Documents & Categories. The name of the category will appear in the document windows, next to the button.
Click the mouse in the text box within the document window, to the left of the . Type the first few letters of the name of the category you want to code the document with. Press Enter to get a list of matching categories. The first match is shown in the space where you are typing; other matching categories can be selected from the dropdown selection below.
As you proceed with coding a document, a list of recently used categories is kept in the dropdown next to the button.
Once you have chosen the category, select the part of the document that you want to code by highlighting the relevant text in the document window. To highlight a passage, click the mouse at its start, hold the mouse down down, and drag the cursor to the end of the passage.
Click the button at the bottom of the document window, and the text is marked as relating to that category. As an alternative, press CTRL+mto mark the selected text passage.
Note how, Once you have done some marking, as you select a category, passages already marked by that category are shown in a highlighted colour (Note: Windows only).
To remove marking by the currently selected category from document text, select the relevant passage and click the . The keyboard shortcut CTRL+, may also be used to unmark text.
After marking some of your data with categories, you can then review all the document sections coded by a category side-by-side. This allows you to compare them, seeing what they have in common, and how they differ.
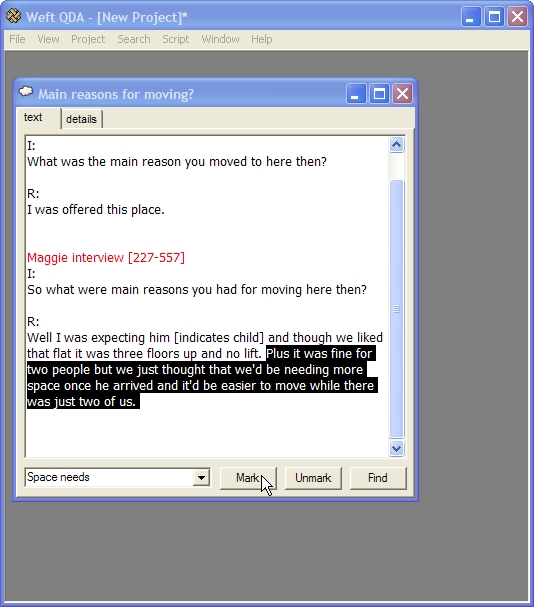
To view all the text marked by a category, either double-click its name in the tree in the Documents and Categories window, or select its name and press the button below. The category opens in a new window in the workarea.
All the text from different documents marked by the category is shown in sequence. Each passage of text has a heading before it indicating which document the text comes from. The passages are shown in alphabetical order by document title. The numbers indicate whereabouts in the document the text is taken from, in numbers of letters.
To view any section of coded text in its original context, double click on the text. The original document will open in a new window and jump to show the coded passage.
The text sections can have further categories applied to them. This is very useful in developing an analysis. The procedure for coding text within a category is the same as coding a source document directly: select the category you want to code with from the tree; select the text sections you want to mark; click the "Mark" button.
The marked text can be copied and pasted into other desktop applications, such as word processors and spreadsheets. To copy text from the category, select the text you want to copy and press CTRL-c. To select all the marked passages from the category, press CTRL-a.
To export all of a category to a file containing all its text along with its memo, first ensure the category is open in the topmost, active window in the Workarea. Then choose from the menu.
You can currently only choose to export HTML, the format that web pages are written in. This is often a suitable format to use the exported file in word-processor as it includes simple formatting and structure information for text passage headings. Suggestions are welcome for other useful formats to export in, and what information to include. PDF is one likely future addition.
Memos allow you to record further information about a category, such as the specific types of things it refers to, or notes about how it was developed.
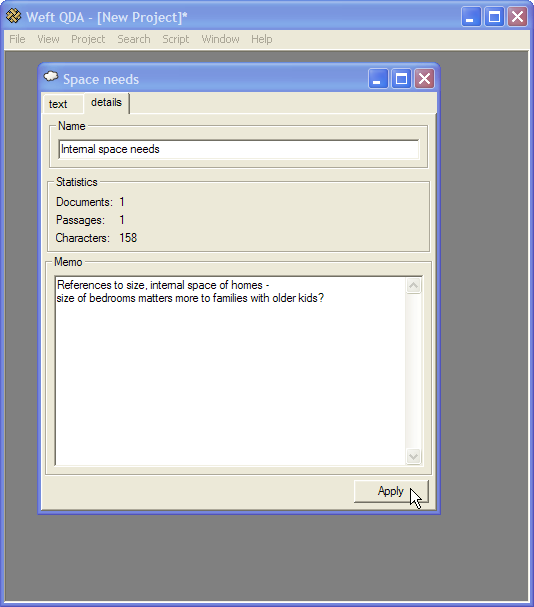
To create or edit a category's memo, open the category, then click the details tab in the category's window. Type the memo for the category in the large text box provided. You can also edit the category's name by typing in the small name box at the top.
To save your changes, click the button in the bottom right. To discard any changes, simply close the category window without applying the changes.
To delete a category, select its name in the category tree in the Documents and Categories window, and press the 'Delete' key on your keyboard. Alternately, choose from the . The category, categories attached to it, and any memos and coding associated with them will be deleted from the project.
Warning
You should think very carefully before deleting a category. Once deleted, a category cannot be retrieved except by reverting a previous version of the project, so losing all your changes since the last save.
As the analysis develops and the number of categories increases, you may find that they need to be re-arranged to keep the category tree manageable.
To move a category, go the category tree and drag the category from its current position to the category under which you would like it to be attached. The procedure is similar to moving a file in Windows Explorer. The category will be moved to the new position, along with all the categories that are attached underneath it.
As well as recording observations about passages within the text of a document, sometimes you may also wish to record facts or observations about a document as whole. Commonly, where documents are interviews, the attributes one might wish to record include known facts about the individual interviewed, such as their sex, age range or membership of a designated part of a sample. You may also wish to apply categories developed in the course of your analysis to documents. Document attributes can be used in conjunction with the search tools to examine the incidence of text marked by certain categories in particular types of documents.
This can be done by marking all the text of a document with a single category. To record an attribute of a document, create a category to represent the attribute. For example, if you wanted to be able to relate the words of interviewees with their sex, you might create a category "Sex", with two sub-categories "Male" and "Female" beneath it. To note that an interview was with a man,select the relevant category in the category tree, open the corresponding document, select all the text in the document - the shortcut CTRL+a is usually available - and click the button.
Table of Contents
The preceding two chapters described how to create categories and documents, and how to mark and retrieve passages of text from your project. Weft QDA offers a number of other ways to navigate project data. As well as simply retrieving text marked by a single category, Weft QDA can search a project for occurrences of words and phrases. It can also match passages against more complex specifications such as "all text segments marked by Category A that are ALSO marked by Category B"; Weft QDA enables this though Queries. Finally, Code Reviews are a way to compare the coding of many categories at the same time to identify patterns and coincidences.
Weft QDA can search through a set of documents and return all the occurrences of a given word or phrase. In Weft QDA, the text results of a text search are presented as a list of extracts, similar to text coded by a category. The results are also automatically saved for later reference.
Select then from the menu. A search dialogue appears.
Enter the word or phrase you want to search for.
Enter the amount of additional text you want returned around each search result. This is used to provide context for each search results.
Choose if you want the search to be case sensitive: if a search is case sensitive, a search for "Nursery" will not return results with the word "nursery" with a lower-case letter.
Choose if you want to match whole words only. If you choose not to match whole words, a search for "nurse" will return results for "nursery" and "nurses" as well.
Click the to close the dialogue and see the search results.
A new window will open showing all the text segments that matched the search term. At the same time, the search results will be saved under the heading "SEARCHES" in the list of categories in the Documents and Categories window.
Searches for single words are much faster that searches that include multiple words, or searches that include punctuation characters
There are no "special" or "regular expression" characters: sometimes one might want to search for a pattern of characters that might match several different words, for example "help", "helped" or "helping". It is possible to do this by allowing the use of "special characters" - punctuation in a search term that specifies a variable pattern of letters that should be matched. For example, 'help(ed|ing)?' would be one way to specify matching all three words, but Weft QDA does not currently support this.
Although search results are saved, they do not automatically update themselves when new documents are added to the project. They always contain search results only from the documents that had been imported when the search was run. Of course, the same search can be run again to find results from new documents.
Queries allow you to ask more sophisticated questions about the categoriesin your project. For example, you might be interested in how often text marked by one category is also marked by another category. Or you might wish to do a text search only within text marked by a certain category. Queries allow you to explore a project in this way.
To start a query, choose from the menu. A dialog appears to allow you to create the query:
Each row in the query window specifies one part of the query. Each row corresponds to a clause. Queries can contain many clauses, but at present it is only possible to create queries with two clauses. Each clause retrieves some text passages from the documents in the project. The clauses are joined by operators - 'AND', 'OR', 'AND NOT' - which determine how the text passages from each clause are combined to find the results of the query. The following types of clauses can be used:
- CODED BY
Retrieves text coded a category. To choose the category whose coding is to be retrieved, type the first few letters of its name in the dropdown box in the middle of the row. Press Enter to find a list of matching categories, and choose the correct one from the dropdown.
- CONTAINS WORD
Retrieves text containing a search word. This works very much like a text search.
To compose a query, clauses are joined by operators. These determine how the text passages returned by each clause are combined to make the results of the whole query. The following operators can be used:
- AND
Combines two sets of text passages by returning only those passages that are found in both sets.
- OR
Combines two sets of text passages by returning text passages that are found in either of the two sets.
- AND NOT
Combines the two sets of text passages by returning text that is appears in the first set and doesn't appear in the second set. Put another way, it removes all text passages found in the second set from the first set. Note that unlike "AND" and "OR", the order in which the clauses joined "AND NOT" matters.
To see the results of a query straight away, click the button at the bottom left of the query window. The results are retrieved, and displayed in the query window's text box. The results can be perused and have coding applied to them.
To save the results of a query to a new category, click the button at the bottom right of the query window. The results are saved to a new category in the category tree under the "SEARCHES" node.
To modify the query, click the query tab above the search results. From here, the clauses and operators in the query can be modified and the query re-run.
Say we have a set of interviews in which parents talk about how comfortable and adequate they find their homes for living with children. Some say they find they have a particular need for more space. So we have a category called "Space needs", which we have used to mark all the passages where the interviewees talk about this topic. You've also recorded the age of the children in the house, using categories for different age groups. (see the section called “Using categories to record document attributes”). We particularly want to look at what the families with older, school-age children say.
To turn this is into a query, we want text passages that are from families with school age children: document text CODED BY the category 'Primary school age' OR CODED BY the category 'Secondary school age'. Then within those we want to look at passages CODED BY the category 'Space needs'. So we create the following query:
To start a code review, choose from the menu. A new window opens in the work area. Choose the categories you wish to compare in the grid, either by selecting them from the main category tree in the Documents and Categories window, or by typing the first few letters of their name in the dropdown and pressing Enter. Then click the or button. To remove a category that has been previously added to the grid, click its name in the row or column label and press the button.
Once there are categories in both the columns and the rows, the grid cells show the number of documents in which text is coded by both the row category and the column category. Each cell within the grid is tinted more or less strongly based on the number of documents in which the coding of the relevant categories coincides.
In the example above, the project documents are interviews with people bringing up children in a neighbourhood. Some of these families already had ties with the area when they moved into their house, such as having relatives nearby or having lived there before. The whole text of these documents has been coded by a category called 'Is Local'. Other families had moved in without existing ties to the neighbourhood, and these are coded as 'Not Local'. Each interviewee was asked how likely they were to move out of the neighbourhood in the coming five years, and the section of the document where they talk about whether and why they might leave has been coded by a category 'Likely to move away' or 'Unlikely to move away'. The code review indicates that a large proportion of "local" families think it is unlikely they will stay in the area, even though the interviews had suggested that these families were generally much happier with the neighbourhood as a place to raise children.
The number of documents coded is usually the most suitable measure when comparing the incidence of coding between documents that are cases, as in this example. In other situations, we may be more interested in the coincidence of particular coded analytic themes within documents. Using the dropdown menu at the bottom of the code review window, it is possible to change the display in the coding grid to show the number of separate passages which are coded by both the row and column categories, or to show the number of letters in those passages.
You can jump from a cell in a Code Review table to see the text passages that correspond to that cell. Double-click a table cell, and the text that is marked by both the row category and the column category is displayed in a new workarea window. In the example above, double-clicking the cell headed 'Likely to move away' and 'Local' would show the sections where the "local" families talked about being likely to move away.
Code Reviews can be exported for use in other applications, such as spreadsheets, statistics packages or simply for later reading. To export a Code Review, first ensure it is the currently focussed window within the Workarea. Then choose from the menu. Weft QDA will prompt you for a file and format to export the Code Review to.
The formats you can currrently use to export Code Reviews in are CSV (comma-separated values) or HTML format. Choose CSV format if you want to use the code review figures in a spreadsheet or statistical package. HTML is more suitable if you want to inspect or print the Code Review using a web browser, or if you want to use it as a table within a word processor.
Table of Contents
The author of Weft QDA has dedicated the code to the public domain. Anyone is free to use, copy, distribute, modify or sell the code in any form, by any means and for any purpose. All patches and other contributions to the code are submitted on the basis that they will be used and redistributed under the same public domain licence as the software itself.
This public domain licence applies only to the design and code of Weft QDA itself. Software components and libraries which are used by and redistributed with Weft QDA may be licensed for your use under different terms. You should consult the documentation for each component if unsure.
The source code for Weft QDA is available for reference, study, modification and re-use. You are very welcome to submit changes to the source code, though you are in no way obliged to submit or share any changes you make. Source code for released versions is made available for download, as described above in the section called “Installation”. The latest development snapshot of the source code may also be obtained by anonymous CVS from RubyForge.
Warning
The CVS HEAD version may well be unstable, and you should only use released versions (which are tagged in CVS as weft_x-x-x) on real projects that you are working on.
If you have used the Windows easy-installer, you may also obtain the source code
directly from the installed files. Open a command prompt, change directory to the
folder where Weft QDA is installed. On Windows, this
will typically be "C:/Program Files/WeftQDA". Type the
command "
weft-qda.exe --eee-justextract
, and the
application libraries will be unpacked into the directory. Weft's libraries are
unpacked into a directory called "lib".
Weft QDA is offered in good faith in the hope that it will be useful for applications in research, teaching and study. However, there is no warranty that it is fit for any particular purpose, or that it will work at all. You use Weft QDA solely at your own risk, and no liability can be assumed for any damage or loss incurred by your use of the software.
Weft QDA does not routinely gather or transmit any information about your use of the software, your projects or the system on which it is being run. However, Weft QDA may collect information about errors and crashes solely for the purpose of improving the software. No crash report information will be sent over the internet without your explicit consent. No personally identifying information is included in crash reports. Crash reports do not normally contain any project data, but may occasionlly include short text excerpts from project documents. If you are working with sensitive data, you should check the content of the error report before sending it, as the error report is sent unencrypted over the internet.
You should be aware that the 'qdp' project file format does not have any special security features to prevent unauthorised viewing of the contents using Weft QDA or other software. You should treat a project file with as much care as you would treat all other research data, ensuring that any and all sensitive information is kept securely. You should check that your use of the software complies with all relevant legal requirements, institutional rules and professional ethical guidelines.
Table of Contents
When I first studied social anthropology, the teaching of research methods and methodology focussed on data collection - fieldwork - and much less on the analysis of the data collected. When five or so years later, I first used a CAQDAS tool, the basic code and retrieve features seemed to me to be useful for the kind of data that many anthropologists work with.
However, having used one package in earnest, and briefly tried a few others, there seemed to be a number of barriers to their wider use. The freeware packages I could find were either unavailable for Windows, or were console or browser-based applications rather than having graphical user interfaces (GUIs).
Commercial packages are expensive and restrictively licensed. The user interface of the commercial packages I've tried also seem daunting, for various reasons. Firstly, some suffer from idiosyncrasies arising from the software's age, or from the whimsy of the software developer. Secondly, they're encumbered by complex options and tools. This complexity is partly due to the range of sophisticated tools which the packages provide, but which many users will never have cause to use. It is also, in some cases, due to the embedding of commitments to specific analytic methodologies into the design of the interface. Whilst perhaps helpful for those familiar with that methodology's terms and processes, it obscures the use of the package for the unfamiliar. For example, much of the sociological literature on qualitative analysis is little cited in social anthropology; I cannot recall ever seeing grounded theory mentioned in an anthropological paper, despite its prominence in recent sociology.
The initial development of Weft QDA was spurred by having a commercial licence expire just as I was starting work on my dissertation research project on credit unions in South London. It was first used for the analysis of interview transcripts and field notes from this fieldwork. Weft QDA is designed to present a GUI that is easily comprehended and used by anyone familiar with common desktop applications and their interface metaphors.
Weft QDA is not designed with any particular analytic method in mind. The process of reading text and selecting and marking passages as "about" a topic, and then later returning to review marked text about that topic is termed "coding". Weft QDA is designed on the principle that this activity is a generic interpretive strategy applied under a range of names in a wide range of social sciences and humanities. It is designed to make this activity straightforward, whilst allowing flexibility for adaptation to various specific analytic approaches.
Weft QDA's qdp file format uses SQLite, a small, fast, file-based relational
database system as its storage format. A QDP file is simply a SQLite database, and can be
opened and exported using the free sqlite program:
http://www.sqlite.org/. The schema of the database is described in
the library file
/lib/weft/backend/sqlite/schema.rb.

